Did you miss our first installment? Check out Bar Design: Why it Matters to Your Bottom Line.
This week brings part two of our series on bar design, and we'll be discussing the best practices and biggest mistakes of bar design.
At the “Bar Design 101” class held at E3 Commercial Kitchen Solutions and hosted by bar and beverage equipment manufacturer Perlick, presenter Corrinne Walenda, corporate training manager & Perlick brand ambassador, said when designing a bar, the bartender should be kept top of mind. This may seem like an obvious statement, but all too often, design and aesthetics trump ergonomics and efficiency. The goal of the bar design should be to create zero-step bartending—everything should be easily within reach and accessible of the bartender.
Mistake #1: Don’t Forget the Trash!
When designing for the bartender, it’s important to acknowledge what they actually do behind the bar. They create drinks, they serve drinks (and sometimes food), and the part that many designers forget—they clean up! Bartenders do everything from picking up finished drinks and dirty glassware to disposing of napkins, straws, and used ice. They need a place to throw that trash away and to stack dirty glasses and dishes. This is where our first big mistake in bar design comes in.
Your bar design needs to incorporates trash! The trash should have a designated spot on your design plans (at least 12 inches), or it will be a last-minute addition that is stuck in a spot that is an eyesore, in the way, or difficult to get to.
Note: Many municipalities are now also requiring recycling, so you may want to include space on your plans for this as well.
Best Practice #1: Clean to Dirty
Speaking of trash and clean-up, a best practice according to Walenda is to design bars left to right, clean to dirty. So the cocktail station at the bar should start with a place for clean glassware, transition to the liquor well and other ingredients, and end with the trash, dump sinks, and a place for dirty dishes and glasses.
Note: There should be one dump sink per cocktail station to enable a speedy clean-up. Also be sure to include a strainer in the sink to catch things like garnishes and straws.
Best Practice #2: Right-handed Stations
Designing left to right should also be considered when placing bottles and tools. According to MedlinePlus, 85-90% of people are right-handed in Western countries, so cocktail stations should be set up for a right-handed bartender.
With this in mind, the bartender’s right or dominant hand should be handling all of the expensive things—namely, the liquor. So the liquor well should be placed to the right of the ice chest with the most popular base spirits in the front and the second favorite in the back.
The left, less dominant hand should be handling less expensive ingredients like garnishes and mixers, so things like the soda gun should go on the left.
Note: Consider the ingredients that need to be refrigerated like garnishes, vermouths, and fresh juices and plan for the refrigerators or refrigerated drawers you will need.
Mistake #2: Mirrored Stations
When creating more than one cocktail station, sometimes designers mirror the stations versus duplicate them. When stations are mirrored, the set-up gets reversed so that the expensive liquor bottles are on a bartender’s left side, and the flow is from dirty to clean.
Walenda says when building more than one cocktail station that it’s important they are duplicated versus mirrored so that every station has the same set-up and bartenders don’t fight to work at the “right” station. Also be sure every station has what a bartender needs so equipment is not being shared, which slows down service.
The only piece of equipment that should be shared is the hand-washing station. Be sure to include side splash walls on the sink and place it at the start of the bar so other staff like servers have easy access to it. This also places it in view of guests so they can see proper hand-washing techniques being used.
Best Practice #3: Counting Cocktail Stations
When planning for how many cocktail stations your bar will need, Walenda says to build for the busiest rush with all seats occupied in your venue. You can always shut down a station if need be, but you can’t add a new one.
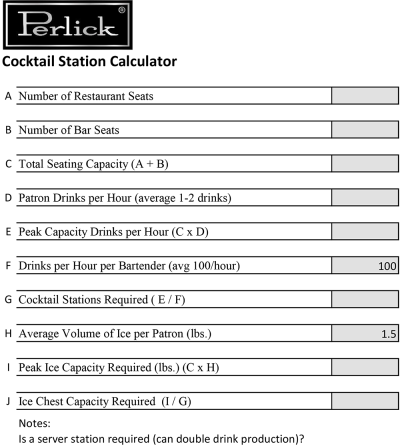
Walenda shared a helpful Cocktail Station Calculator tool to help you determine just how many cocktail stations your venue will need based on the number of seats, the amount of drinks per hour made by bartenders, and ice volume. The tool also calculates how much ice capacity you will need.

Note: You may also want to consider a separate table service cocktail station if your venue does a lot of table service in addition to the bar. Have a less-than-personable bartender? Walenda points out that this non-guest-facing station is a perfect place for them.
A table service station is also a good place for delivery/pick-up orders, if you don’t already have a specified area. Make sure there is storage for takeout bags, napkins, menus, etc.
Mistake #3: Storage
If you don’t plan for the storage of odds and ends like menus, napkins, cocktail picks, and check presenters, your bartenders will shove these items into any and all available nooks and crannies. In fact, don’t forget to fill in spaces between the bar top and the tops of equipment with a faceplate or a façade. Don’t forget casters on your equipment as well.
Finding a place to store clean glassware can also be a problem. If the health department allows it, consider hanging your glassware from above, upside down.
Best Practice #4: Critical Dimensions
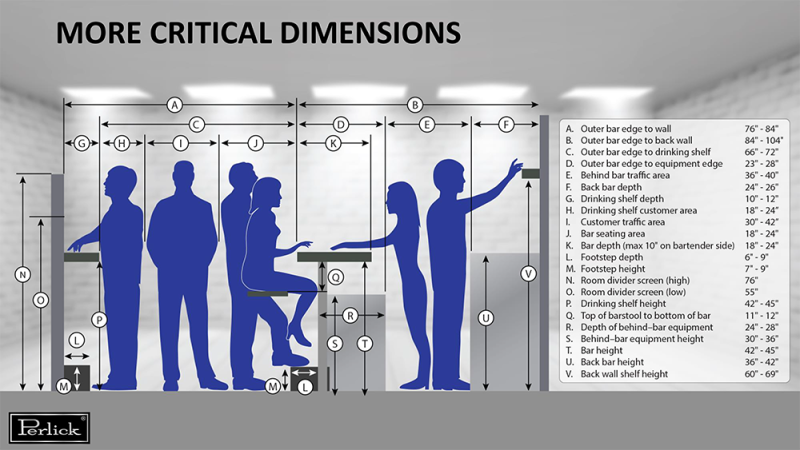
Proper dimensions are key in the limited space behind the bar. Here are some metrics to keep in mind:
- There should be a max of 10-11 inches between the bartender’s hips against the speed rail and the drink rail. For this reason, Walenda advises not specing a double speed rail, which requires the bartender to lean over further, creating a bad ergonomic design.
- For more important measurements, see the chart below:

Best Practice #5: Ice & Refrigeration
When building out your bar and cocktail stations, consider your ice situation. How much of it do you need? Will you be using craft ice? How many types of ice will you need to store?
For multiple ice types, be sure to spec an ice chest with dividers. If you’re using craft ice, it must be in its own freezer. And be sure to spec enough ice chests (see the calculator tool, above). Remember, bigger isn’t always better when it comes to ice chests. If they’re too deep, they can be difficult to reach into. And if they’re very big, they will be harder to evacuate.
For refrigeration, be sure to have enough refrigerators on hand for your cans/bottles program. The ideal space between the front bar and back bar refrigeration should be 36-40 inches, but if you’re tight on space and have less than 36 inches, you can spec refrigerators with narrow (19-inch versus 24-inch swing) or sliding doors.
Mistake #4: Back Bar Refrigeration
Back bar refrigerators should be 24 inches deep, not 31 inches like in restaurant kitchens. If you spec the wrong size, the refrigerator will stick out from the rest of your equipment behind the bar.
In your measurements, Walenda suggests adding an inch on either side of the unit so it can be easily pulled out and cleaned/maintained.
Miscellaneous Considerations
Some final points to consider when designing your bar include:
- Make sure you have dipper wells for bartenders to store their tools and keep them clean.
- Walenda advises specing a high-temp glasswasher because it kills viruses like the flu and COVID. Be sure it’s a model that evacuates the steam before you open it. And remember, glasses need their own washer and should not be placed in the back-of-house dishwasher.
- Your bartenders need task lights—especially if your establishment has low lighting or is dark. Walenda recommends specing LED lighting at 6000K.
- When building your bar, if you choose a modular design, be prepared for a longer lead time and the need for the bar to be installed first, since it must be bolted to the subfloor.
- Decide if you want your POS station under the bar so that bartenders can still face and interact with guests, or further in the back of the bar, which gives bartenders a moment to turn around and decompress as they’re inputting an order.
Next week we will finish our series on Bar Design with an article on 10 design trends to know when designing your bar.
Plan to Attend or Participate in Bar & Restaurant Expo, March 27-29, 2023
To learn about the latest trends, issues and hot topics, and to experience and taste the best products within the bar, restaurant and hospitality industry, plan to attend Bar & Restaurant Expo, March 27-29, 2023 in Las Vegas. Visit BarandRestaurantExpo.com.
To book your sponsorship or exhibit space at Bar & Restaurant Expo, contact:
Veronica Gonnello(for companies A to G) e: [email protected] p: 212-895-8244
Tim Schultz(for companies H to Q) e: [email protected] p: 917-258-8589
Fadi Alsayegh(for companies R to Z) e: [email protected] p: 917-258-5174
Also, be sure to follow Bar & Restaurant on Facebook and Instagram for all the latest industry news and trends.
